Git for designers who code
More and more designers have started coding recently, and Git has become part of their everyday toolkit. It’s a powerful system, but it can also be confusing or feel overly complex.
With efficient Git use, routine tasks become easier and less of a burden. Here, I’ll share my daily workflow, written for designers but hopefully useful for developers too.
Note: This article is intended for readers who already have some experience with Git. It also presumes that you use GitHub (or are ready to try it). Examples and screenshots are from macOS, so details may vary on other operating systems.
Aliases
I use Git both in the terminal (iTerm2 with Oh My Zsh) and in GitHub Desktop. The latter is very capable, and I recommend giving it a try even if you’re a devoted command-line fan — more on that later.
Tip: You can assign a keyboard shortcut to open a terminal. When I press ⌃ Control ~, the terminal immediately pops up on top of all windows.
It’s handy to have some aliases for Git commands. With them, you can gm 'Fix typo' instead of git commit -m 'Fix typo'. Some of my aliases come from the default Git plugin for Oh My Zsh, while others are tweaked for personal convenience. Here are the aliases I use most often:
| Alias | Full command | Action |
|---|---|---|
gst | git status | Show the working tree status |
ga | git add . | Stage all files in the current directory for commit |
gm | git commit -m | Commit with a message |
gc | git checkout | Switch to another branch |
gcb | git checkout -b | Create a new branch |
gcm | git checkout $(git_main_branch) | Switch to the main branch |
For pulling and pushing I don’t mind typing git pull and git push1.
I also like to set up aliases for quick navigation to project directories. For example, when I type roadsigns, the terminal runs cd ~/code/roadsigns for me — and voila, I’m in the right directory, ready for yarn start. If for any reason I need to open the current directory in Finder, I type open .
Configuring aliases depends on your system and shell, but usually you’ll need to edit your ~/.zshrc or ~/.bashrc file. It’s easy to find instructions specific to your setup with a quick web search.
GitHub Desktop
If you use GitHub and haven’t tried GitHub Desktop yet, I highly encourage you to give it a shot. It’s simple, it’s well-designed, it has keyboard shortcuts, and it makes everyday tasks easy.
Sure, most of what GitHub Desktop offers is also available from the command line, but with such a great GUI, everything feels smoother and safer.
I can switch between repositories and branches with ease, explore diffs, and commit my changes more quickly and thoughtfully. The commit history is always at hand, and once you’ve fetched the repository, it loads in no time. This really shifts the perspective.
Diffs
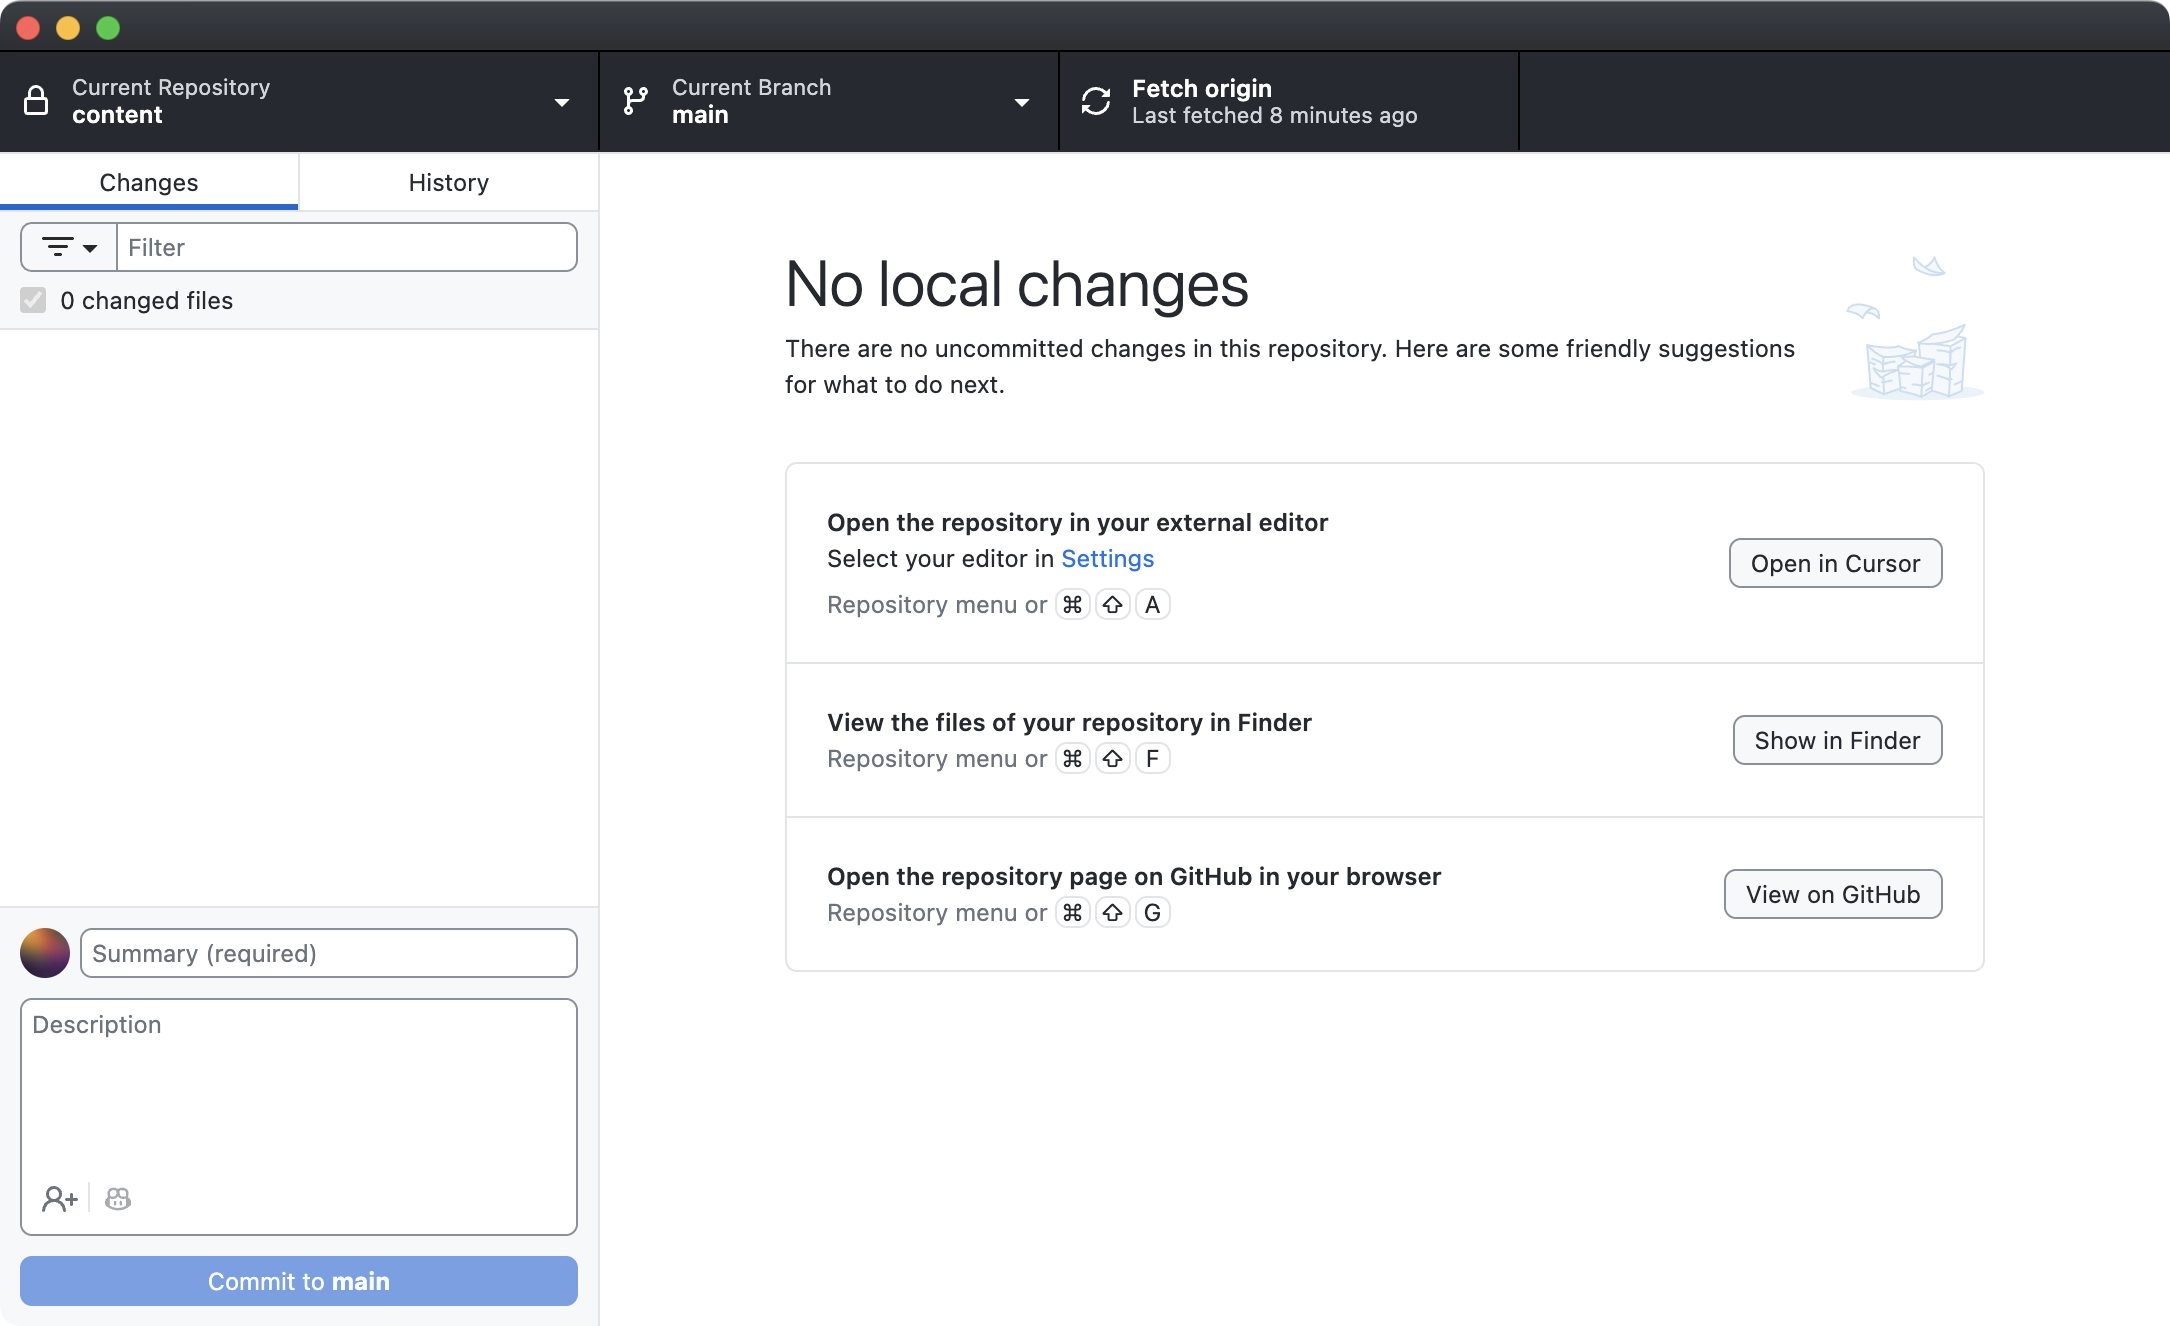
A diff shows a comparison between two versions of code — typically between your changes and the last commit. This is very helpful for spotting mistakes and evaluating the work you’ve done.

It’s much more meaningful to see a diff than a generic status message:
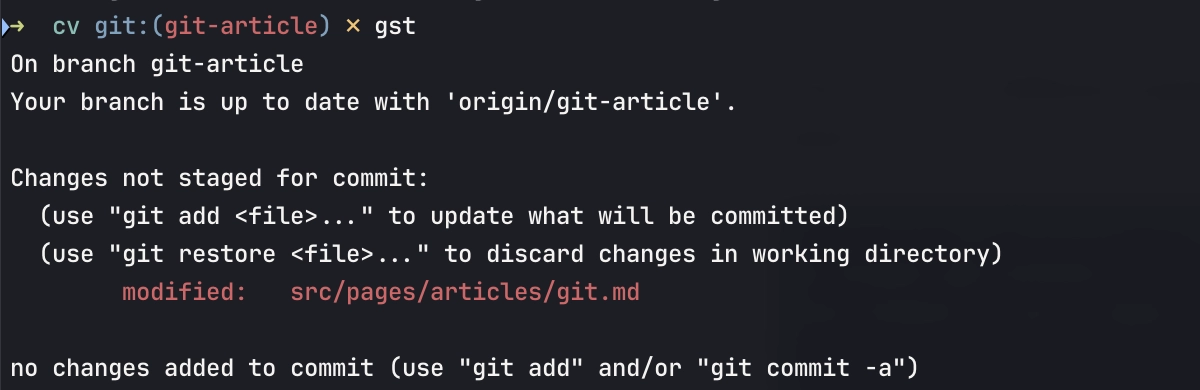
In GitHub Desktop, diffs appear automatically whenever you save a file. This is far more efficient than using git diff — and the Desktop’s diffs are clearer and more informative. See for yourself! (Now, if you see a colon at the end of the diff and have no idea how to exit, press ⇧ Z Z or type :q) 🤷♂️
Diffs aren’t only for text — you can compare images, too! This helps you see the difference clearly and catch anything that’s wrong.
Keyboard shortcuts
Keyboard shortcuts in GitHub Desktop make it even faster and more fun to use. Here are my favorites:
| Shortcut | Action |
|---|---|
| ⌘ G | Set focus to the Commit summary input |
| ⌘ ⏎ | Commit changes |
| ⌘ ⇧ U | Update from the main branch |
| ⌘ P | Push (or publish branch) |
| ⌘ R | Create a Pull Request (or open an existing Pull Request page) |
| ⌘ ⇧ G | Open the repository on GitHub |
The Generate commit message button was added recently. I’d been looking forward to it for a long time! I use it occasionally, and when I do, I remove the long description and make the summary shorter. I only wish it were a bit faster.
Pull Request culture
Previously, I often pushed directly to the main branch and rarely used branches. That worked fine for small projects, but since I started working on larger ones, I’ve been using branches most of the time.
For example, I’m writing this article in a git-article branch of my website. This lets me commit and push freely, see in-between diffs, and avoid messing things up if I want to make any other changes on the website.
When the article is ready, I’ll press ⌘ R in GitHub Desktop. This opens the Pull Request page in the browser:
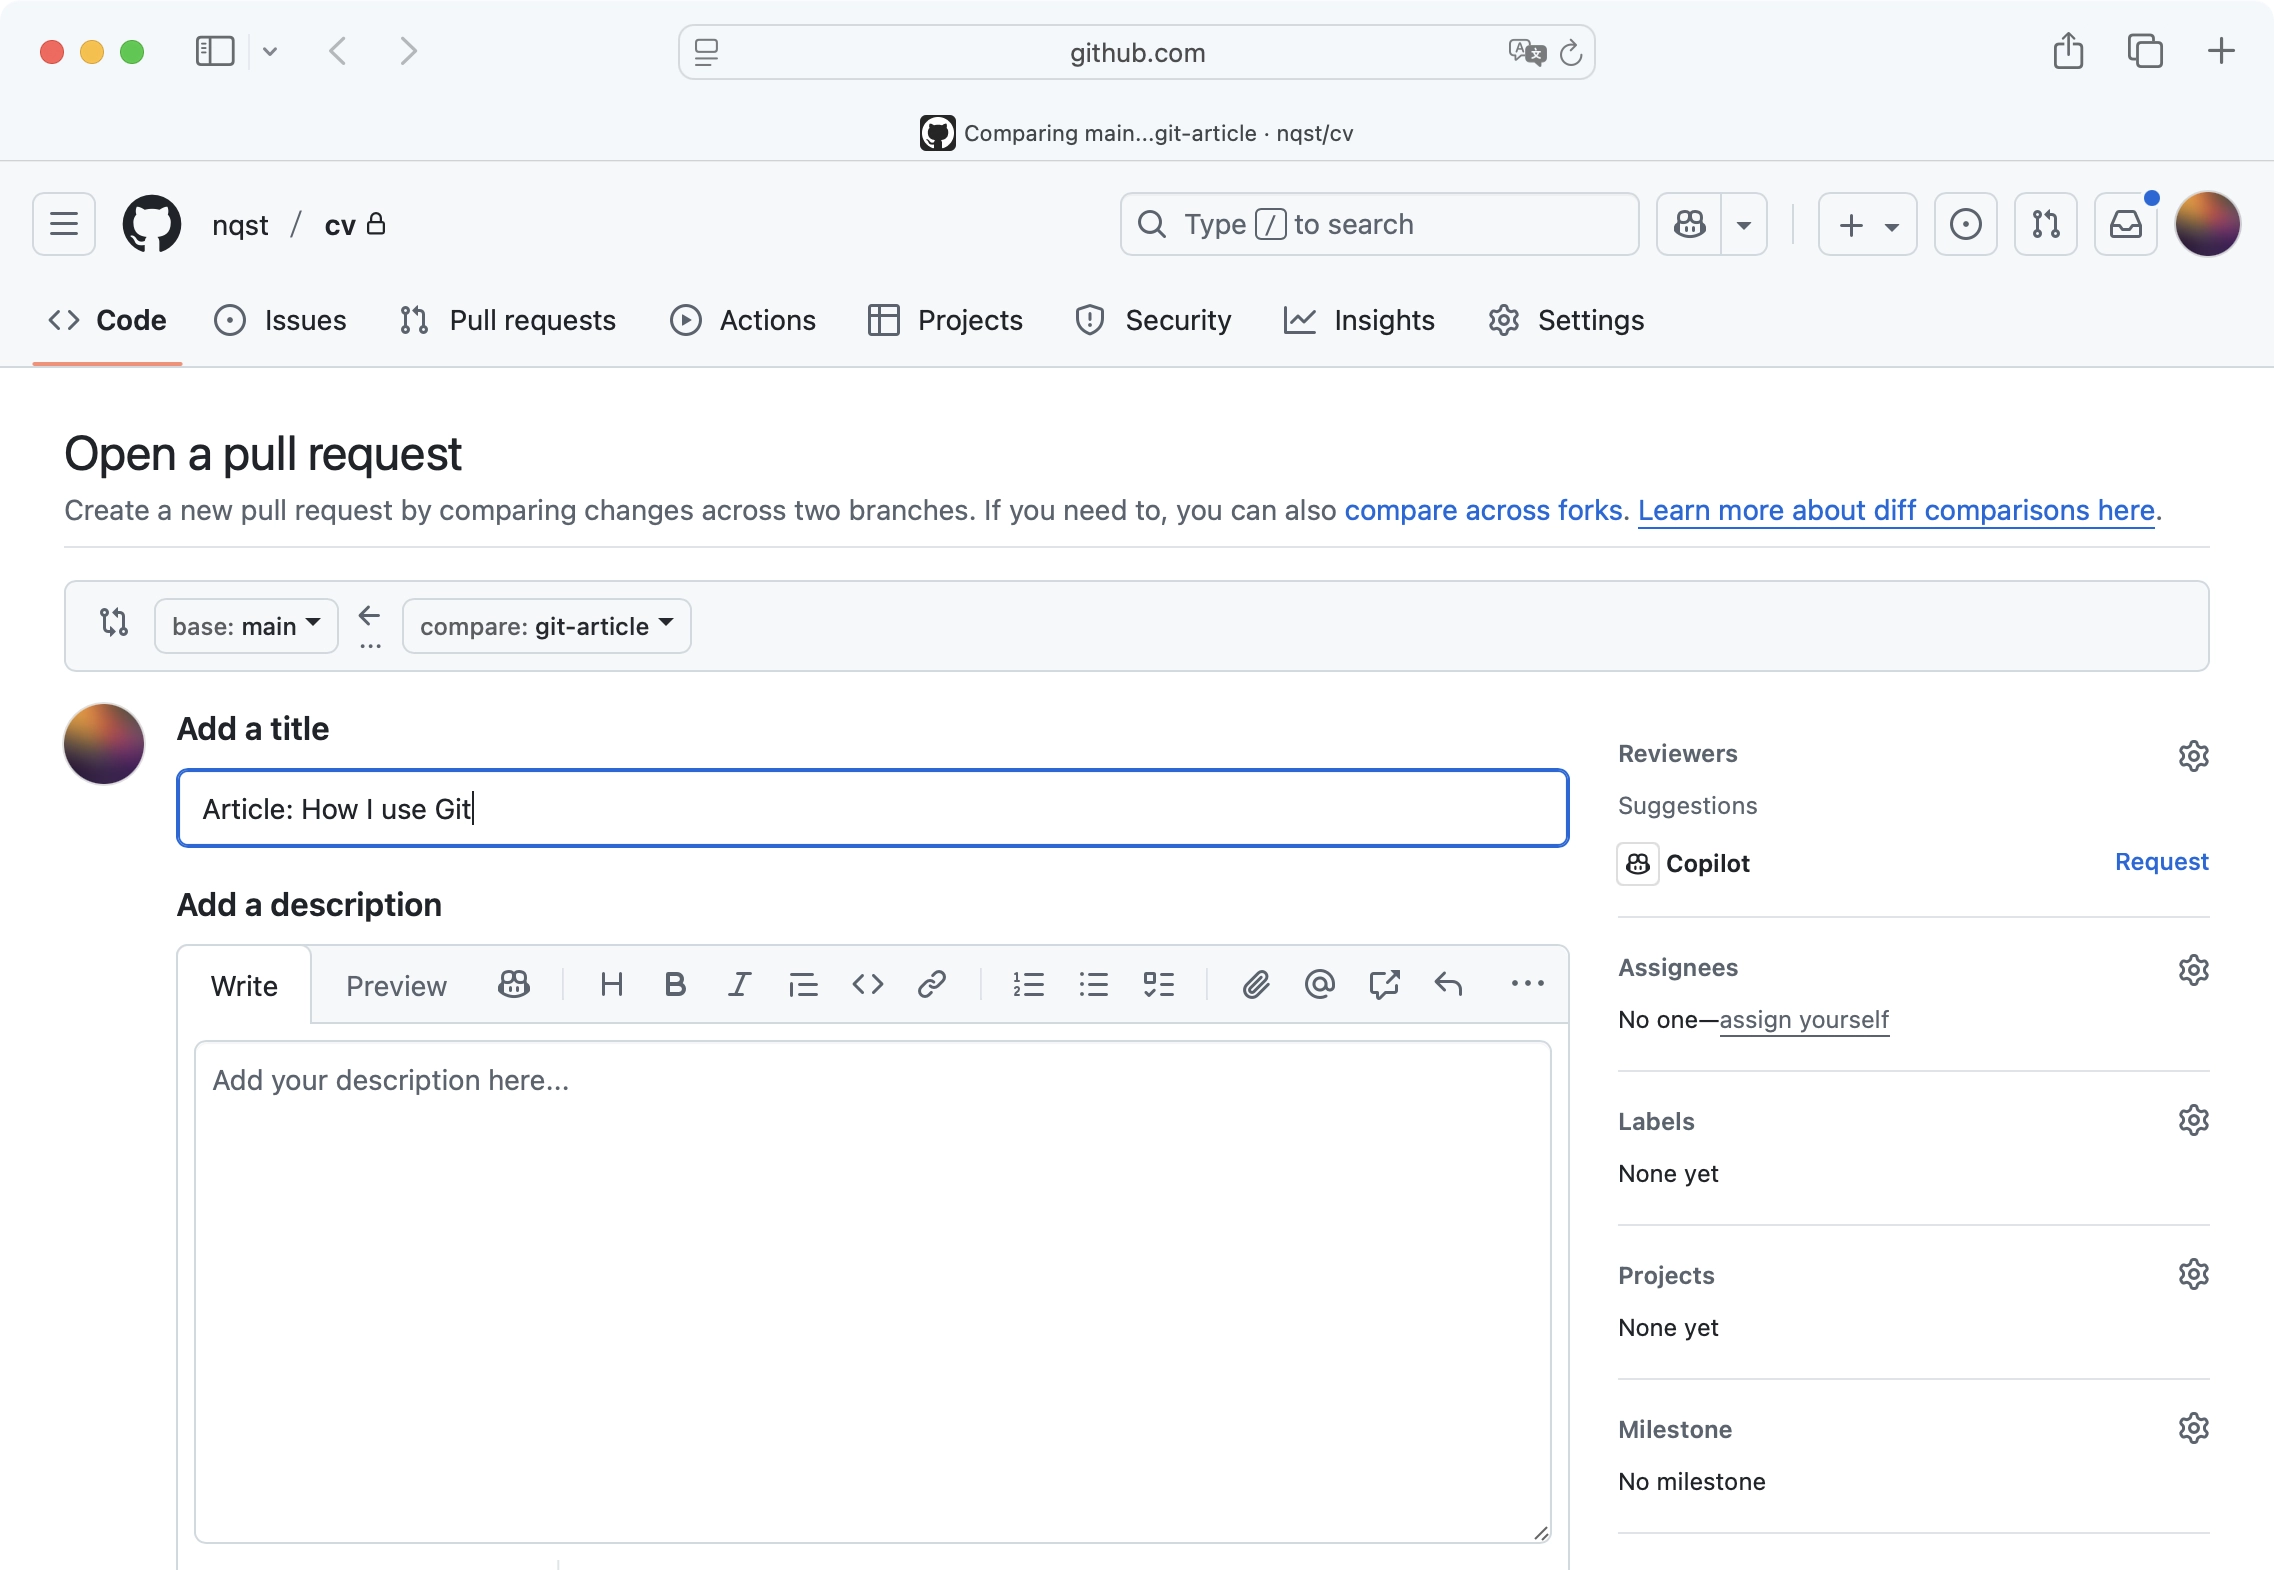
There, I’ll see all the changes compared with the main branch. I’ll review them, apply edits if necessary, and then create the Pull Request.
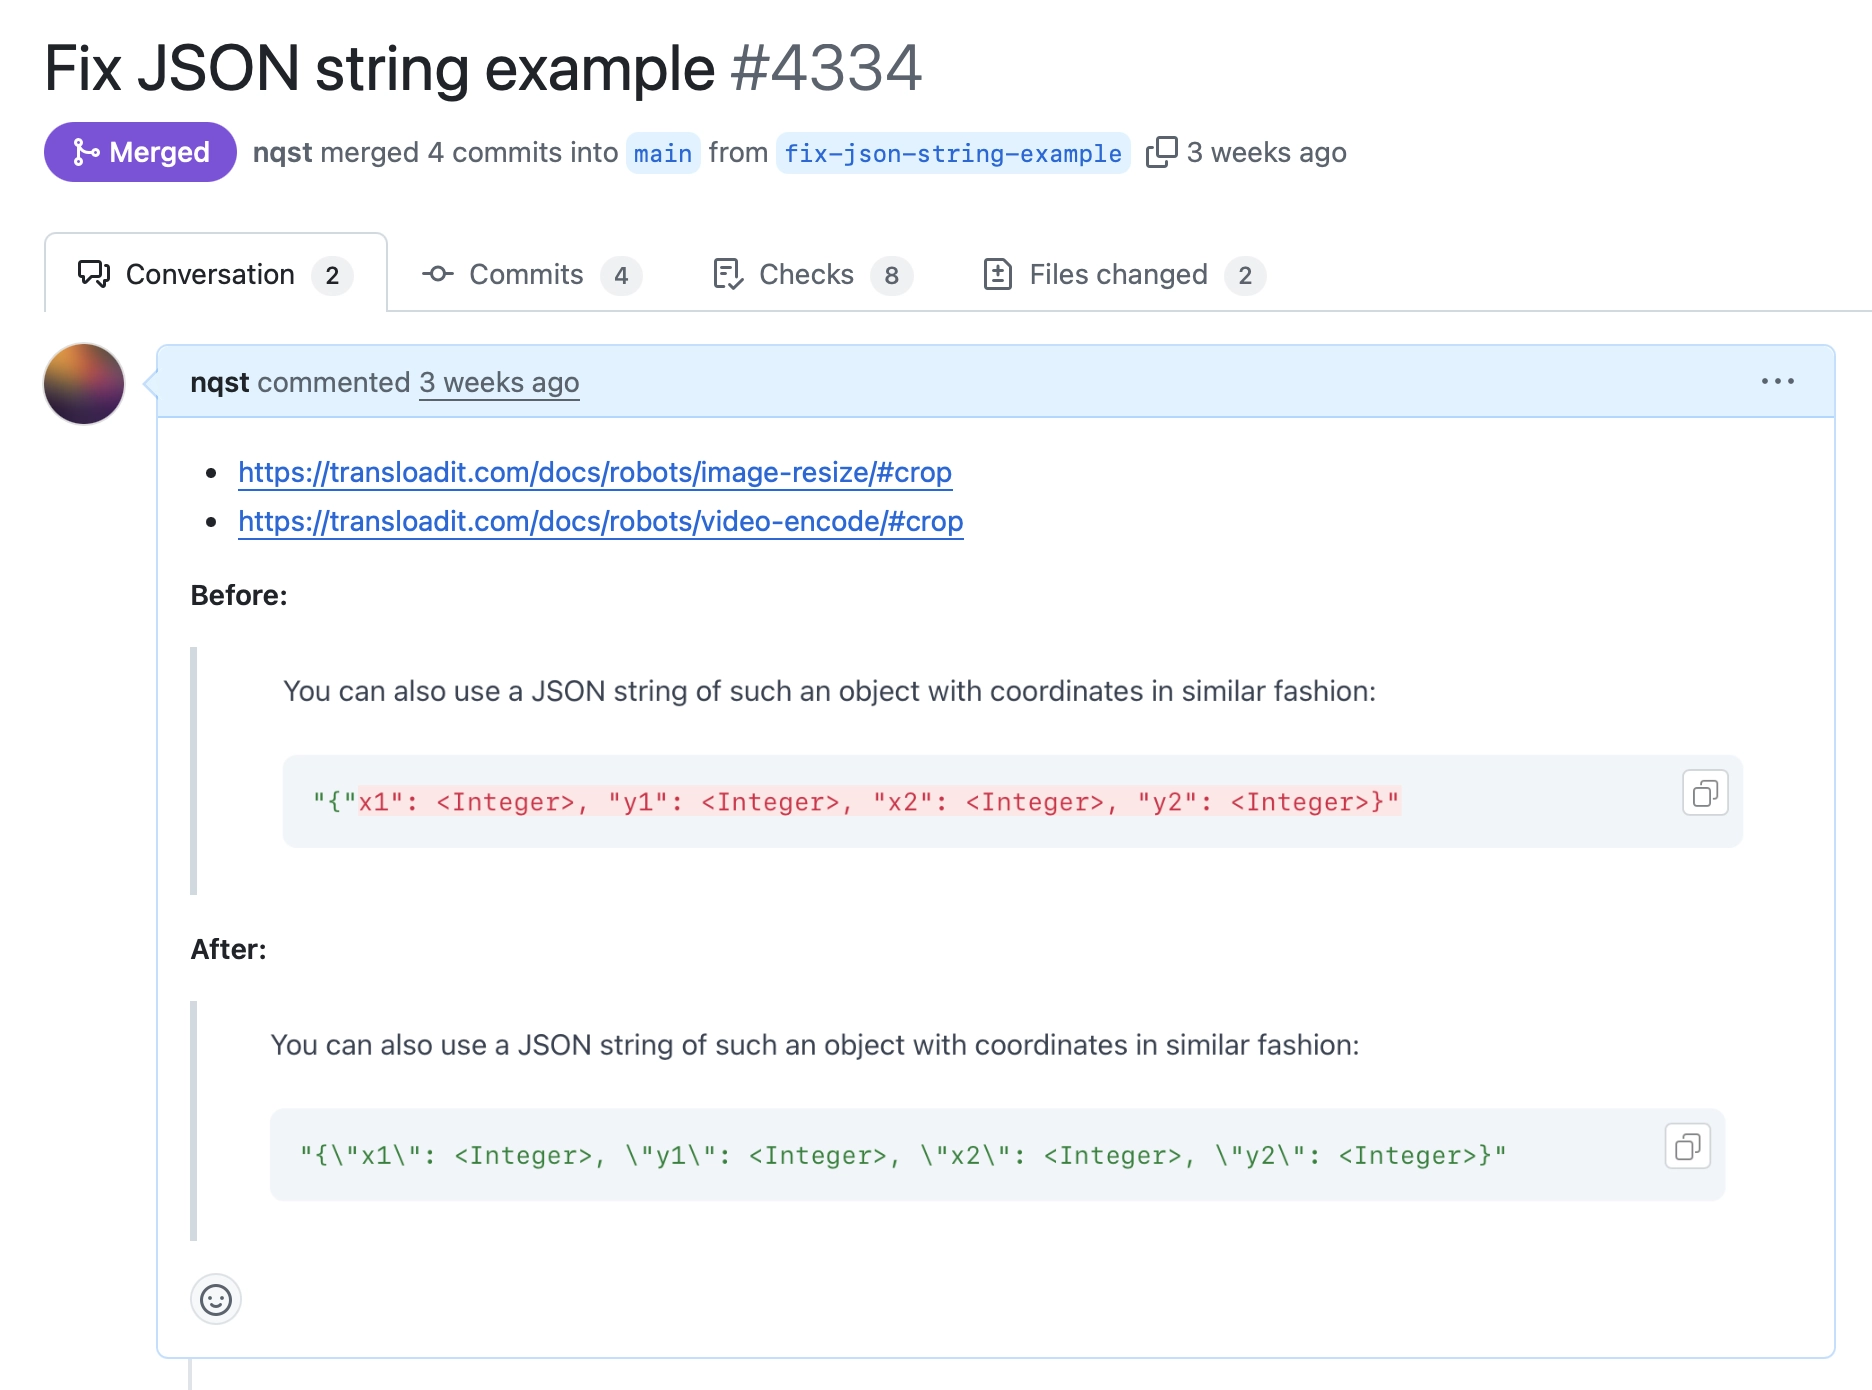
If a project has other contributors, I’ll go through all the changes, assign a reviewer (or a few), open the Pull Request, and wait for feedback. This is where GitHub shines the most.
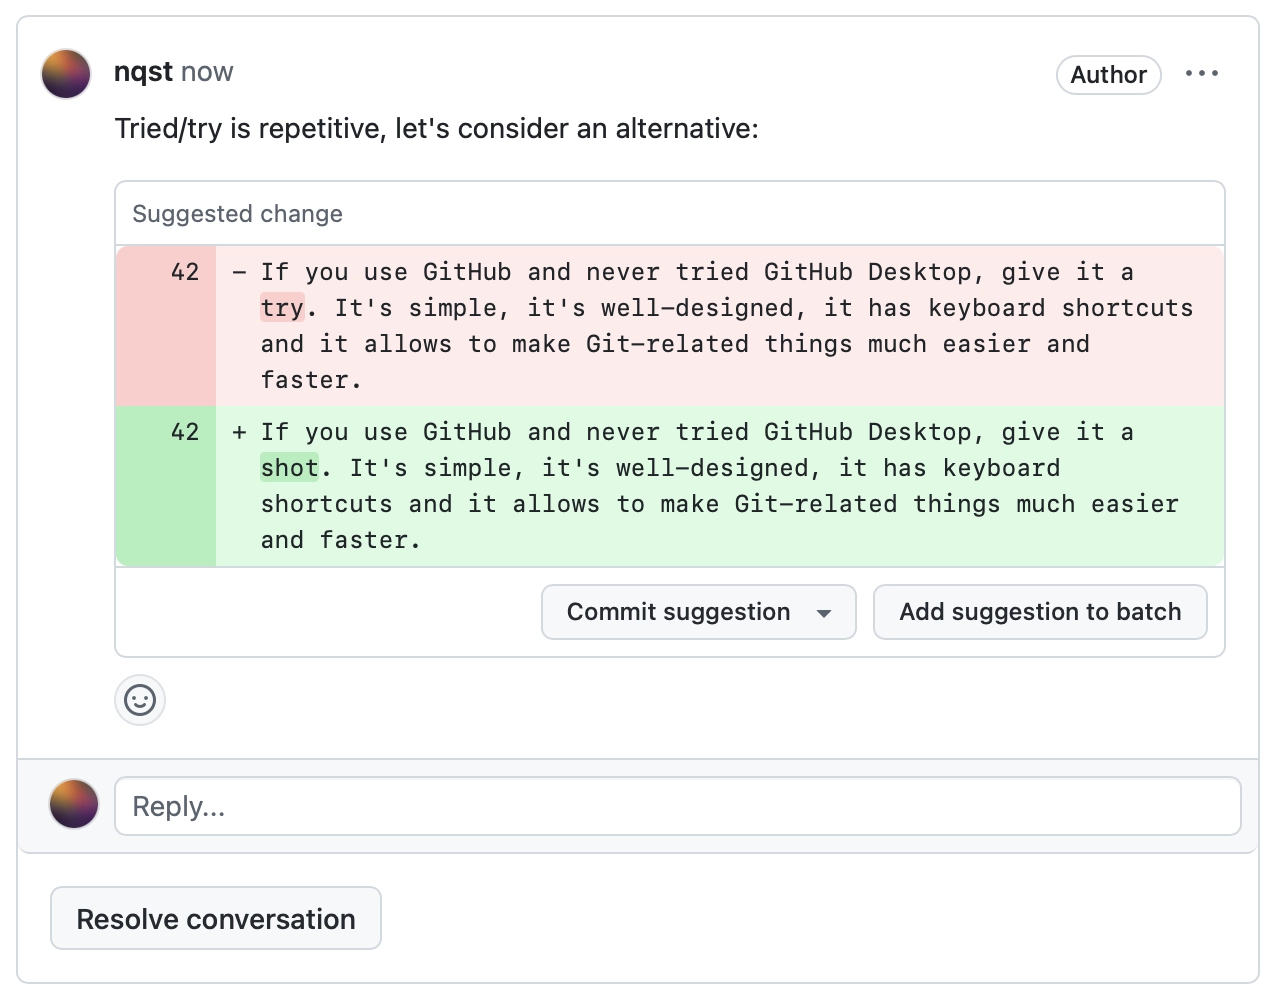
Reviewers not only get a convenient diff, they can also leave in-place comments and code suggestions. For example, below I suggested adding a link in a Markdown file. If the author approves the suggestion, it can be committed immediately, right in the browser!
It’s so great when the context is clear. No need to awkwardly point to lines, no need to copy-paste anything. Discussions are attached directly to code lines, you can create as many threads as you want, and discuss everything in a convenient way. I love using inline suggestions for all sorts of things: code, wording, even typos.
A Pull Request description can provide an overview of the changes before the reviewer looks at the diff. It’s worth taking the time to work on it. It doesn’t have to be formal, but it’s very helpful to see what the changes are about. GitHub has rich formatting possibilities, so you can make it nice.
Add references if you have them. This could be a discussion link, a customer support ticket, or a GitHub issue. Use “closes,” “fixes,” or “resolves” with the issue number, and GitHub will automatically close the issue when the PR is merged.

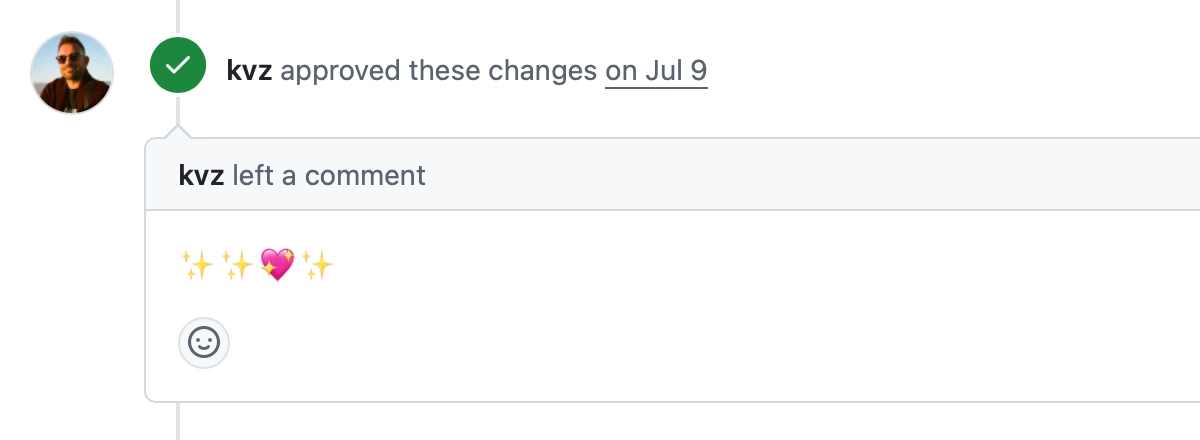
I owe a lot of my GitHub culture to Kevin van Zonneveld, a co-founder of Transloadit. I admire the way he approves Pull Requests — not silently, but with a sprinkle of positive feedback. It might be a brief comment, a funny GIF, or a few emojis. A human touch alongside the approval checkmark always feels good, especially when you work remotely.
Conflicts
Conflicts happen. Don’t let them scare you.
The most common case is when you change something in a branch and it turns out that the same thing has also been changed in another branch.
For example, you changed a CSS variable but forgot that you had also recently modified it in main. A conflict arises: Git isn’t sure which change to apply and needs you to resolve it.
The key thing to remember is that both changes were probably made for a reason. Do your new changes make the other changes irrelevant? Do you need to combine them? Or should the changes from the other branch replace yours?
Git updates the file with conflict markers, and you need to edit the file to fix things up. These markers can be hard to understand, but fortunately, modern editors like VS Code or Cursor make it easier by clearly indicating the current and incoming changes:
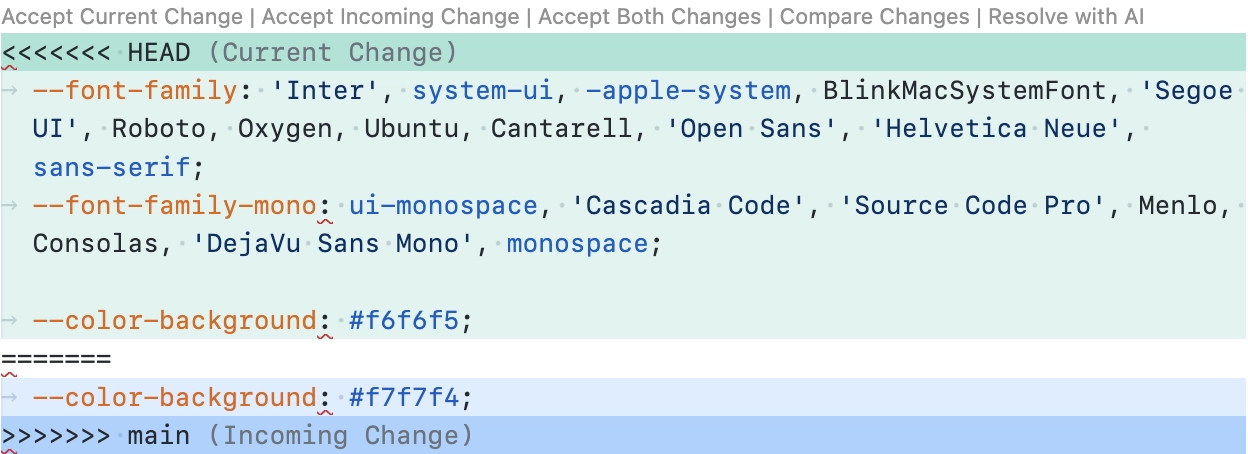
The changes on a light teal background are from my branch, while the changes from main are shown on a blue background. I know that all my branch changes are relevant, so I’ll click Accept Current Change — this resolves the conflict. However, sometimes I need to mix both changes. In those cases, I usually resolve conflicts manually.
After resolving a conflict, review the diff in the merge commit. Changes there should make sense to you.
Undos, discards, and friends
Some actions I wish were simpler often sent me to Stack Overflow. But even after finding an answer, the solution sometimes felt fragile. In GitHub Desktop, you can perform those actions with a few clicks, very intuitively.
Examples: Undoing a commit, discarding changes, stashing (when you aren’t ready to commit yet but need to switch branches), or picking specific lines to commit.
These features are useful and bring more clarity to your work, but if things get too complex, you might give up and sacrifice quality. It’s better to avoid that.
More complex stuff
Git is incredibly versatile. Every now and then I discover something new that pleasantly surprises me (a recent example: bisect). If you run into trouble or need to do something unusual, chances are you’ll find a top-voted question and answer on Stack Overflow. Modern AI is also good at casting some magic spells — just think before hitting Enter (useful in life too).
P.S. Don’t force-push unless absolutely necessary. If you find yourself doing it all the time, something is wrong — and the fix is most likely simple.
Final thoughts
Git can be tricky at times, but today we have all the tools and resources to use it with joy. That’s also thanks to GitHub — it’s a remarkably well-designed platform.
I hope you found something useful in this article. If you have any questions or comments, feel free to reach out — send me an email or ping me on X or Bluesky.
Footnotes
-
Just
git push, without needing to specifyoriginand the branch name. If it doesn’t work and you see the No upstream branch error, run this command:git config --global push.autoSetupRemote true. ↩